Introduction
I recently replaced the front suspension on my 1998 VW Golf Cabrio and thought I'd share a few photos of the process.Disclaimer: This article is intended for supplementary reference only. This process is dangerous and could result in damage to you and/or your car and void its warranty. Always consult a certified mechanic if you are not confident in carrying out the work yourself, and make sure you read the service manual specific to your car before commencing.
Tools required
- Trolley jack
- Axle stand
- Spanner set
- Socket set
- Spring compressors
- Breaker bar or impact wrench
- Car service manual
- VW suspension nut tool
- VW suspension nut tool
- 2 hours of time (if all goes well!)
Optional tools
- Blow torch
- Grinder
Optional tools
- Blow torch
- Grinder
Difficulty
I found changing the front suspension a real PAIN IN THE ASS. The coil retaining nut was completely rusted solid on the driver's side and they are not accessible without destroying the existing mounting. After cutting off the spring retaining assembly with a grinder, I realised that there wasn't one with the new suspension kit and so had to source one separately. All of the other nuts were very challenging too, requiring 'persuasion' with a blow torch. Only attempt this if you are good at removing rusted nuts!
Method
1. Jack up the car securely and remove the wheel. I recommend using an axle stand as well as the jack, and also placing the wheel underneath in case it collapses whilst you're working on it.
2. Remove the two nuts as shown in figure 1. I needed to use some heat at this stage!
3. Remove the brake line bracket as shown in figure 2.
4. Remove the ABS sensor cable as shown in figure 3.
5. You need to use a special VW suspension nut tool on the top retaining nut. I did not have one of these and couldn't source one in time, so I had to fabricate my own from a 22mm deep socket, using a Dremel (figure 5).
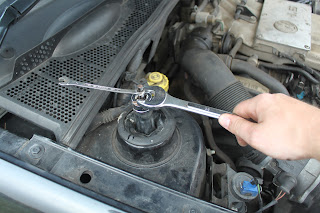
6. Insert an Allen key into the top of the strut and hold it firmly still. Now use a spanner to rotate the removal tool counter-clockwise. Mine was rusted solid and so the blow lamp had to come out again (figure 6).
7. The top retaining plate should now come off, freeing the strut (figure 7). This can then be removed from underneath the car.
8. I then needed to replace the strut. THIS STEP IS DANGEROUS! The coil is compressed with spring compressors. At this stage the spring is storing a huge amount of energy and if suddenly released could cause you or others around you serious injury (see pictures in my other post: http://benjiosaur.blogspot.co.uk/2012/12/changing-rear-shock-absorber-on-1998-vw.html).
9. With the spring compressed, it's now time to start the real fun! Getting the spring retaining nut off. You may be lucky enough for it to not be rusted, if so then great! Otherwise you'll need to find a way of removing the hard-to-get-to nut. There will be entire forums on this :-) As mentioned above, I had to resort to cutting the mounting off and replacing it.
10. I then swapped out the old strut with the new one, and reversed the whole process. I used new mounting components as they came as part of the strut kit, the only original part that I reused was the coil. Please refer to your workshop manual for the correct torque specifications for each nut replaced.
11. Now it is advisable to have your wheels professionally laser aligned. It might sound extravagant but your tracking will most likely be misaligned, causing uneven tyre wear and unstable steering.
11. Now it is advisable to have your wheels professionally laser aligned. It might sound extravagant but your tracking will most likely be misaligned, causing uneven tyre wear and unstable steering.
Photos
Figure 1. Remove this nut and the one below
Figure 2. Remove the brake line bracket
Figure 3. Remove the ABS sensor cable
Figure 4. Allen key in top of suspension strut
Figure 5. Fabricated suspension removal tool on top mounting nut
Figure 6. Turn suspension tool counter clockwise whilst holding Allen key still
Figure 7. Top retaining plate removed
Goodluck!
Please leave comments and suggestions below.


